How to Activate DNS Manager from Client Area of HayHost

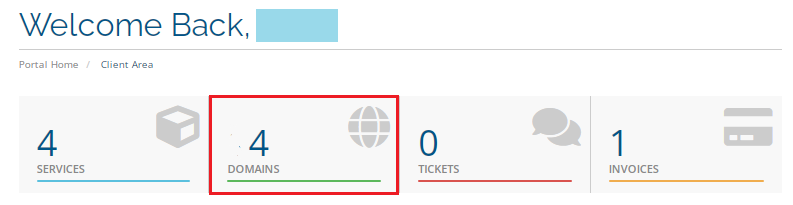
1. Navigate to your HayHost Home page, then click "DOMAINS" (It will display a list of your domains).


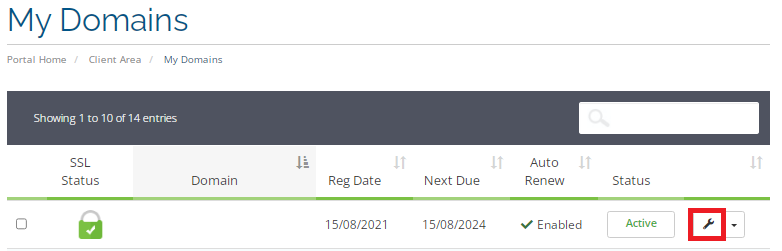
2. In the "My Domains" section, choose the domain you want to create DNS for and click the "Settings" icon.


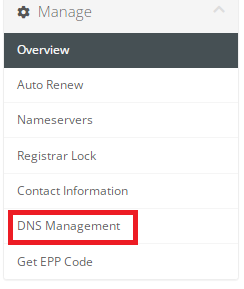
3. On the left side of the window that opens, select "DNS Management".


4. To create a DNS zone, click the "Yes, Create" button.


5. Default DNS zone was created, now you can edit or add all necessary records.

6. If you want to remove the created DNS management, just click "Delete DNS Zone".


Congratulations, now you know how to activate DNS Manager!

  • DNS manager
  • 0 Users Found This Useful
Was this answer helpful?

Related Articles

How to Change the Name Servers of Your HayHost Domain

1. From your HayHost account Home page, navigate to "DОMAINS" (You'll see the list of domains you...

How To Manage DNS Records (MX,CNAME and A) in cPanel

1. Locate the Domains section of cPanel and click on the "Zone Editor" icon.   2. Find your...

I changed the DNS pointers to your Servers but still can't see my site

It can often take up to 48 hours for the DNS zone transfers to replicate to some ISPs and for you...

How to Transfer Your .am Domain Name to HayHost

First, domain transfer is free, so you can just write a letter or call us and our team will help...

How to Change Owner for .am Domain Name

To change owner for .am domain: 1. Download the Application form, fill out, print, sign, stamp...